In today’s digital world, remote file sharing has become an essential aspect of business operations. Whether you need to transfer important documents, collaborate on projects, or access files from a remote location, having a secure and efficient method is crucial. Remote Desktop Protocol (RDP) is a powerful tool that allows you to connect to and manage a remote Windows desktop. In this step-by-step tutorial, we will guide you through the process of setting up and utilizing Best RDP for secure remote file sharing.
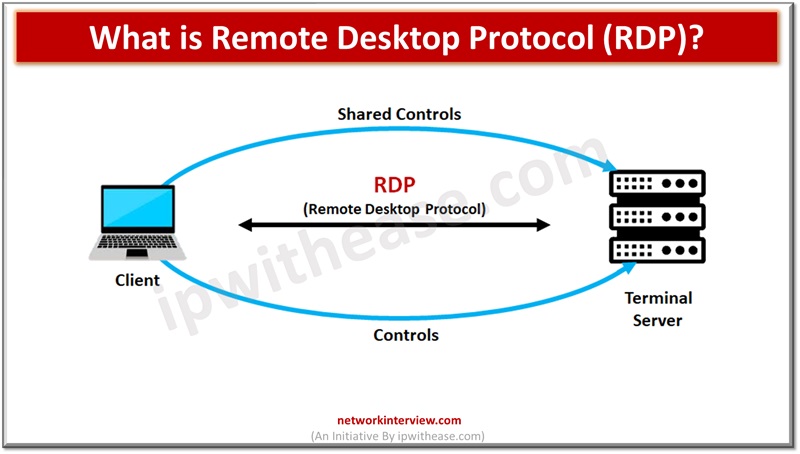
What is Remote Desktop Protocol (RDP)?
Remote Desktop Protocol (RDP) is a proprietary protocol developed by Microsoft that enables users to connect to and control a remote desktop or server over a network connection. With RDP, you can access the graphical interface of a remote computer and perform tasks as if you were physically present at that location. This can be a good solution for any kind of remote file sharing, as the transfer of files between the local machine and the remote desktop is quick.
Remote File Sharing with RDP
Step 1: Configure Remote Desktop Connection
To initiate a remote desktop session and enable file sharing, you need to configure the Remote Desktop Connection application on your Windows PC RDP. Follow these steps to get started:
- Click on the Start button and search for “Remote Desktop Connection” or “RDC.”
- From the search result you can open the Remote Desktop Connection application .
- Once the application is open, enter the IP address of the remote computer you wish to connect to in the “Computer” field.
- Click on the “Show Options” button to access the advanced settings.
- Select the “Local Resources” tab to configure the sharing settings for the remote session.
- In the “Local devices and resources” section, click on “More” to expand the options.
- Expand the “Drives” section and check the box next to the drives you want to share with the remote computer.
- To save the settings click on “OK” and you will be return to the main screen.
- Finally, click on the “Connect” button to establish the remote desktop connection.
Step 2: Accessing Files on the Remote Desktop
Once you are connected to the remote desktop, you can access the files on the remote computer using the Windows File Explorer. Follow these steps to access and transfer files:
- From the context menu select “File Explorer” by right-clicking on the Start button.
- In the File Explorer window, you will see the shared devices under the “Redirected drives and folders” section.
- You can go to the desired file or folder on the remote computer.
- Coping of any file or folder,just right-click above it and select “Copy” from the context menu or you can also use keyboard shortcut by pressing Ctrl + C.
- To paste the copied file or folder to your local machine, navigate to the desired location in the File Explorer and right-click on an empty space. Select “Paste” from the context menu or use the keyboard shortcut Ctrl + V.
- The file or folder will be copied from the remote desktop to your local machine.
Step 3: Disconnecting from the Remote Desktop
Once you have finished working on the remote session and transferred the necessary files, it is important to disconnect properly to free up resources. There are two methods for disconnecting from a remote desktop session:
Sign-Out Method
To sign out correctly and close the session, follow these steps:
- Right-click on the Start button or press the Windows key + X to open the power user menu.
- Hover over “Shut down or sign out” and click on “Sign out” in the submenu.
- Alternatively, you can open the Start Menu, right-click on the user icon, and click on “Sign out.”
- By signing out, you release the resources used by the remote desktop session, allowing others to connect and use the remote desktop.
Disconnect Method
The disconnect method keeps the session open for a length of time until you reconnect. Follow these steps to disconnect from the remote desktop session:
- Click the power button to bring up the Start Menu.
- Select “Disconnect” from the menu.
- As an alternative, you can access the power user menu by right-clicking the Start button or by pressing the Windows key + X. Click “Shut down or sign out” after that, then choose “Disconnect.”
- The session will remain active until you reconnect or a specified time limit is reached.
Conclusion
In conclusion, mastering the art of secure remote file sharing is a fundamental skill in today’s digitally-driven business landscape. This step-by-step tutorial has elucidated the process of leveraging Remote Desktop Protocol (RDP) for seamless and secure file transfer between local and remote machines. By following this step-by-step tutorial, you can securely transfer files between your local machine and a remote desktop using Remote Desktop Connection. Remember to configure the necessary settings, access files through the Windows File Explorer, and disconnect properly to free up resources. Remote file sharing has never been easier with the power of RDP at your fingertips.
FAQs
- Can I transfer files through Remote Desktop?
Yes, Remote Desktop Protocol (RDP) allows you to transfer files between your local machine and the remote desktop. By configuring the Remote Desktop Connection application and enabling drive sharing, you can seamlessly copy and paste files or use the Windows File Explorer to transfer files.
- Is Microsoft Remote Desktop file transfer possible only between Windows machines?
No, users can access a Windows PC from a Mac, Linux, Android, or iOS device by using the RDP tools that Microsoft offers. Mac users can enable remote desktop connection file transfer by sharing resources via the “Redirection” tab inside the Remote Desktop app.
- What protocol does RDP use to transfer files?
File transfers between the local computer and the remote desktop are accomplished via Remote Desktop Protocol, an exclusive protocol used by RDP. This protocol ensures secure and efficient file transfer over the network connection.
- Is Remote Desktop TCP or UDP?
RDP primarily uses TCP (Transmission Control Protocol) for its communication. TCP provides reliable and ordered delivery of data packets, making it suitable for remote desktop connections, where data integrity is crucial.
- What should I do if I encounter the “Destination Folder Access Denied” message while transferring files?
If you receive the “Destination Folder Access Denied” message when attempting to transfer files, it may be necessary to restart the RDP session. Run the Remote Desktop Connection application as an administrator to ensure proper access permissions.
Continue Reading:
Difference between File Level Storage and Block Level Storage