IPSec VPN Set Up – Palo Alto
Site-to-Site VPN Overview
A VPN connection that allows you to connect two Local Area Networks (LANs) securely is called a site-to-site VPN. Route based VPN can be configuring to connect Palo Alto Networks firewalls located at two sites or to connect a Palo Alto Networks firewall with a third-party security device at another location. Palo Alto firewall can also communicate with third-party policy-based VPN devices. Palo Alto sets up route based VPN tunnel to take routing decision to choose destination and all traffic handled by VPN tunnel.
IP Security (IPSec) set of protocols is used to set up a secure tunnel for the VPN traffic, and the information in the TCP/IP packet is secured by ESP encryption. The IP packet (header and payload) is embedded into another IP payload, a new header is applied and then passed through the IPSec tunnel. Source IP address in new header is local VPN peer and destination IP address is far end peer. When packet reaches far end, header is removed and only original IP packet is left.
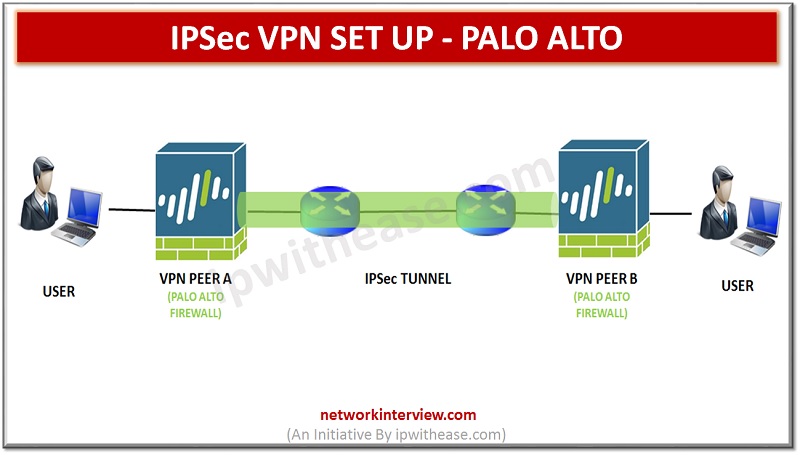
Diagram above depicts a VPN tunnel between two sites. When a user that is secured by VPN Peer A needs data from a server located behind VPN peer B. If the security policy permits the connection, VPN Peer A uses the IKE Crypto profile parameters (IKE phase 1) to establish a secure connection and authenticate with VPN Peer B. VPN tunnel is established by using the IPSec Crypto profile to allow the secure transfer of data between the two sites.
IPSec VPN Set Up: Palo Alto Networks
Setting Up Site-to-Site VPN
- Configure interface as a layer 3 interface.
- Create the tunnel interfaces and assign in separate zone so tunnel can use different policies.
- Set up static routes or assign routing protocols to route traffic to the VPN tunnels.
- Define IKE gateways for establishing tunnel between the peers and setting up protocols and algorithms for identification, authentication and encryption for VPN tunnels in IKEv1 Phase 1.
- Set up the parameters of tunnel that are needed to establish the IPSec secure tunnel for transfer of data across the VPN tunnel.
- Define security policies to filter and inspect the traffic between tunnels.
Site-to-Site VPN with Static Routing
In this scenario, VPN connection between two sites is set up by using static routes. Tunnel interfaces on VPN Peer A and VPN Peer B do not require an IP address because the firewall uses the tunnel interface as the next hop for routing traffic across the sites. Static IP address is assigned to each tunnel interface for monitoring.
Step 1: Configure a Layer 3 interface for IKE phase 1 tunnel establishment.
Step 2: Create a tunnel interface and attach it to a virtual router and security zone.
Step3: Configure a static route, on the virtual router, to the destination subnet.
Step 4: Set up the Crypto profiles (IKE Crypto profile for phase 1 and IPSec Crypto profile for phase 2) on both ends.
Step 5: Set up the IKE Gateway.
Step 6: Set up the IPSec Tunnel.
Step 7: Create policies to apply on tunnel interface to allow traffic between the sites.
Step 8: Commit any pending configuration changes. Click Commit.
Step 9: Test VPN Connectivity.
Site-to-Site VPN with OSPF
In this case, each site uses OSPF for dynamic routing of traffic.
Step 1: Configure a Layer 3 interfaces on each side of both firewall.
Step 2: Create a tunnel interface and attach it to a virtual router and security zone.
Step 3: Set up the Crypto profiles (IKE Crypto profile for phase 1 and IPSec Crypto profile for phase 2) on both ends.
Step 4: Set up the OSPF configuration on the router and attach the OSPF areas with the appropriate interfaces on the firewall.
Step 5: Set up the IKE Gateway.
Step 6: Set up the IPSec Tunnel.
Step 7: Create policies to apply on tunnel interface to allow traffic between the sites
Step 8: Verify OSPF adjacencies and routes from the CLI.
Step 9: Test VPN Connectivity.
Site-to-Site VPN with Static and Dynamic Routing
In this scenario, one site uses static routes and the other site uses OSPF. When the routing protocol is different between two peers, redistribution profile must be configured on firewall to participate in both static and dynamic routing process. Without this redistribution profile routing protocol do not exchange any route information with other protocols running on the same router.
Step 1: Configure the Layer 3 interfaces on each side firewall.
Step 2: Set up the Crypto profiles.
Step 3: Set up the IKE Gateway.
Step 4: Create a tunnel interface and assign to a security zone.
Step 5: Set up the static route and the OSPF configuration on the router and assign the OSPF areas with the appropriate interfaces on the firewall.
Step 6: Create a redistribution profile to inject the static routes into the OSPF autonomous system.
Step 7: Set up the IPSec Tunnel.
Step 8: Create policies to allow traffic between the peers.
Step 9: Verify OSPF adjacencies and routes from the CLI.
Step 10: Test VPN Connectivity.
Conclusion
Virtual private networks (VPNs) create tunnels that allow users systems to connect securely over a public network to transfer data. To set up a VPN tunnel, both end Palo Alto Networks firewalls need to authenticate each other and encrypt the data traffic between them.


