How to configure Juniper SRX Firewall? Step by Step Guide
We can’t imagine a network without a firewall, they are the staple of almost every network in the IT landscape. The firewalls provide protection to nearly every network-based transaction. Over a decade the underlying technology has changed rapidly as the way firewalls and technology have undergone a major shift from stateful inspection firewalls to firewall devices as a service gateway. Deep inspection from service gateway firewalls is the new firewall of the future.
Today we look more in detail about Juniper SRX Next generation firewalls, a true service gateway firewall and understand how to configure them.
Steps to Configure Juniper SRX Firewall
In this topic we are covering how to configure NGFW and set up a new SRX device to connect to the Internet.
When we login to a new SRX box there is no password for root.
1. Press enter.
login: root
Password:
— JUNOS 12.1X47-D20.7 built 2017-03-03 21:53:50 UTC
root@%
2. Use CLI to enter Operational mode
root@% cli
root>
3. Use configure command to enter configuration mode
root> configure
Entering configuration mode
[edit]
root#
Now we will configure Juniper SRX as gateway. Use commit command to apply as active configuration
4. Configuring root password
root# set system root-authentication plain-text-password
New password:
Retype new password:
[edit]
root#
5. Create new user
[edit]
root# set system login user mad1 class super-user authentication plain-text-password
New password:
Retype new password:
6. Provide host name
[edit]
root# set system host-name letsconfig-SRX
[edit]
root# commit
commit complete
[edit]
root@letsconfig-SRX#
8. DNS server setup on Juniper SRX
[edit]
root@letsconfig-SRX# set system name-server 8.8.8.8
9. Enable SSH on SRX
[edit]
root@letsconfig-SRX# set system services ssh
10. Setup NTP and time zone
[edit]
root@letsconfig-SRX#set system time-zone Asia/India
[edit]
root@letsconfig-SRX# set system ntp server time.google.com
11. Assign IP address
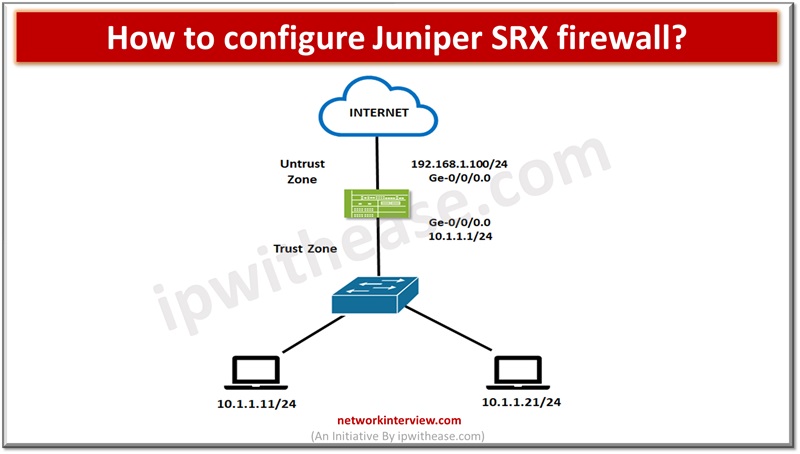
set interfaces ge-0/0/1 unit 0 family inet address 192.168.1.100/24
set interfaces ge-0/0/2 unit 0 family inet address 10.1.1.1/24
*Family inet means IPv4 and inet6 means IPv6
12. Establish zone configuration
user@hostj#set security zones security-zone un-trust interfaces ge-0/0/1.0
user@hostj#set security zones security-zone un-trust host-inbound-traffic system-services all
user@hostj#set security zones security-zone un-trust host-inbound-traffic protocols all
user@hostj#set security zones security-zone trust1 interfaces ge-0/0/2.0
user@hostj#set security zones security-zone trust1 host-inbound-traffic system-services all
user@hostj#set security zones security-zone trust1 host-inbound-traffic protocols all
13. Establish security policy for zone
edit security policies from-zone trust1 to-zone un-trust policy our-internet-policy
set match source-address any
set match destination-address any
set match application any
set then permit
exit
edit security policies from-zone un-trust to-zone trust1 policy our-deny-policy
set match source-address any
set match destination-address any
set match application any
set then deny
exit
commit
** everything is allowed in the outgoing path and deny everything in the incoming path.
14. Configure static route as routing protocol
set routing-options static route 0.0.0.0/0 next-hop 192.168.3.1
15. NAT/PAT configuration
set security nat source rule-set ourr-nat-rule-set from zone trust
set security nat source rule-set ourr-nat-rule-set to zone untrust
set security nat source rule-set ourr-nat-rule-set rule ourr-nat-rule match source-address 10.1.1.1/24
set security nat source rule-set ourr-nat-rule-set rule ourr-nat-rule match destination-address 0.0.0.0/0
set security nat source rule-set ourr-nat-rule-set rule ourr-nat-rule then source-nat interface
16. Enable Intrusion detection prevention(IDP) in SRX firewall
set security idp idp-policy recommended
set security idp idp-policy idpengine
17. Configuring one of the IDP policy as default policy
set security idp default-policy recommended
18. Check to confirm if default policy configured on device
show security idp default-policy
Continue Reading:
Introduction to Juniper SRX Firewall
NAT vs PAT: IP Address Translation Explained
Tag:Juniper SRX


