Firewall Serving as Egress Gateway: Networking Scenario
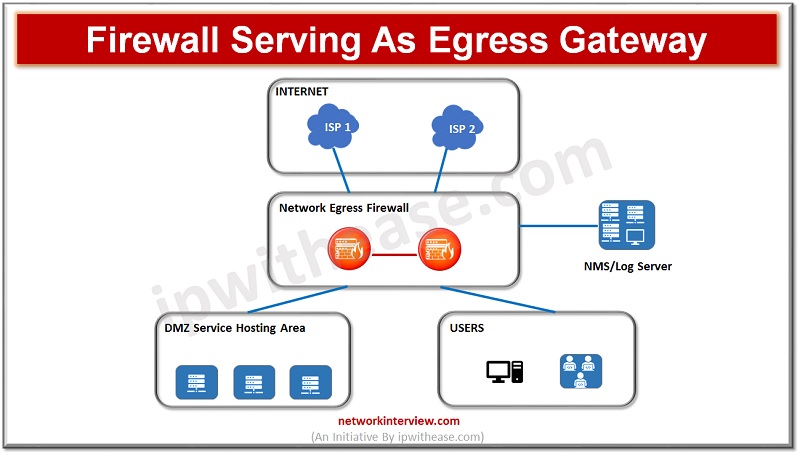
(Diagram depicting firewall acting as Egress Gateway)
As enterprises are moving onto cloud their critical business applications, infrastructure services and use of hybrid clouds have evolved, secure networking is the demand of time along with performance and scalability of networks and applications. Controlling and managing traffic coming from the Internet is one of the key aspects of security.
The need is for a network which allows outbound communication to the Internet but prevents Internet from initiating connection to cloud instances.
Today we look more in detail how firewalls whose primary job is traffic filtering can be configured to act as an egress gateway to an enterprise network to isolate traffic between enterprise Intranet and external network.
Firewall Service as the Egress Gateway
Typical setup of a firewall acting as Egress gateway is depicted above in the diagram. It provides following functions:
- Network Address Translation – The firewall provides a source NAT function and translates private IP address of a remote user to public IP address. It also functions as a NAT server to translate the Private IP address of a hosted server to a public IP address for access of external users.
- Intelligent uplink selection modes are provided by firewall such as destination IP address based and application based using multiple Internet access links to ensure quality
- The firewall will isolate security zones using security policies using functions such as intrusion prevention, and Anti-DDoS.
- Source Routing and Auditing – Firewall logs pre-NAT and post-NAT IP addresses and online and offline activities of remote users for source tracking and auditing.
Configuration: Egress Gateway
Configuring IP address of WAN interface – choose Internet access mode as per information provided by ISP. Access mode could be DHCP, static IP address, PPPoE and LTE.
Internet Access Modes | Configuration Commands |
Internet access via DHCP
| 1.Type interface interface-type interface-number 2.Type ip address dhcp-alloc to enable client DHCP function Run the save command to save the configuration |
Static IP address | 1.Type interface interface-type interface-number 2.Type gateway ip-address command to configure the default gateway address for the firewall (IP address provided by carrier) 3.ip address ip-address {mask | mask-length} command to configure the IP address and subnet mask of the firewall 4.Add the firewall’s uplink interface to a security zone 5.Run the firewall zone untrust command to create a security zone 6.Type add interface interface-type interface-number command to add the firewall’s uplink interface to the security zone. 7.Run the quit command to return to the system view. Run save command to save the configuration. |
PPPoE | 1.Configure a dialer interface 2.Type dialer-rule dialer-number {{ip | ipv6} {deny | permit} | { acl | acl6} acl-number } command in the system view, and configure a dialer ACL. 3.Type interface dialer number command to create a dialer interface and enter the dialer interface view 4.Type link-protocol ppp command to configure the link layer protocol as PPP for the interface 5.Type dialer user username command to configure the dialup user name. 6.Type dialer bundle number command to specify a dialer bundle for the dialer interface 7.In the dialer interface view, configure the IP address of the dialer interface Configure an IPv4 address for the dialer interface Type ip address ip-address {mask | mask-length} command to configure an IP address for the dialer interface Type ip address ppp-negotiate command to configure the interface to obtain an IP address from the remote device through PPP negotiation. Configure an IPv6 address for the dialer interface 1.Type ipv6 address {ipv6-address prefix-length | ipv6-address/prefix-length} command to configure an IPv6 address for the interface. 2.Enable PPPoE client on the interface 3.Type interface interface-type interface-number command to enter the interface view. 4.Type pppoe-client dial-bundle-number number [ no-hostuniq] [ idle-timeout seconds [ queue-length packets ] ] [ ipv4 | ipv6] command to specify a dialer bundle for the PPPoE session. 5.Type ip route-static 0.0.0.0 0 {nexthop-address | interface-type interface-number} [ preference preference ] command to configure a static route to the PPPoE server. Run the save command to save the configuration |
LTE (Connecting carrier network using 4G) | Configure selection of a PLMN 1.Type interface cellular interface-number command in the system view to enter the LTE cellular interface view 2.Type plmn search command to search for a PLMN. 3.Select a PLMN 4.Type plmn auto command to configure automatic selection of a PLMN. 5.Type plmn select manual mcc mnc command to configure manual selection of a PLMN 6.Type mode lte {auto | gsm-only | lte-only | wcdma-only} command to configure the 4G LTE network connection mode for an LTE data card. Configure an APN profile 1.Type quit command to return to the system view. 2.Create an APN profile. 3.Type apn profile profile-name command to create an APN profile and enter the APN profile view. 4.Type apn apn-name command to configure an APN 5.Run the quit command to return to the system view. Bind the APN profile to the LTE cellular interface 1.Type interface cellular interface-number command to enter the LTE cellular interface view 2.Type apn-profile profile-name command to bind the LTE cellular interface to the APN profile. 3.Type quit command to return to the system view Configure C-DCC for dialup connection 1.Configure a dialer ACL 2.Type dialer-rule dialer-number { acl acl-number | { ip | ipv6 } { deny | permit } } command to configure a dialer ACL for a dialer access group Enable C-DCC 1.Type interface cellular interface-number command to enter the LTE cellular interface view 2.Type dialer enable-circular command to enable the C-DCC function 3.Type dialer-group group-number command to configure a dialer access group for the dialer interface 4.Obtain the IP address using the WWAN dialup mode 5.Type ip address negotiate command to configure the LTE cellular interface to obtain an IP address dynamically. 6.Type dialer number dial-number [ autodial ] command to configure a dialer number 7.Type ip route-static 0.0.0.0 0 { nexthop-address | interface-type interface-number } [ preference preference ] command to configure a default route. Authenticate a PIN 1.Type interface cellular interface-number command to enter the LTE cellular interface view. 2.Type pin verification enable [ auto ] command to enable PIN authentication on an LTE data card 3.Type pin verify [ auto ] command to authenticate the PIN. 4.enter the PIN. When the message PIN has been verified successfully is displayed on the interface after a period, the PIN has been authenticated successfully. Run the save command to save the configuration. |
Firewall Registration with Campus Network
Run the api call-home connect [ host hostname] command to connect to Campus network
Continue Reading:
NAT Reflection: FortiGate Firewall
NAT Type 1 vs 2 vs 3 : Detailed Comparison
Tag:Security


